Uncategorized

Magic Points and “Interesting” Fabric Choice by LQS


My LQS is doing a block of the month using Marti Michell templates


Block of the month from LQS
Block of the Month LQS Fabrics

Quite honestly, this is the first BOM I’ve ever been involved in locally.  I AM  thoroughly enjoying cutting and stitching the blocks EXCEPT for the fabric my LQS chose.  I know, I know… beauty is in the eye of the beholder but do any of you see the beauty?? Maybe I should post a larger view!
As another example, here are a two more blocks.

Marti Michell Blocks
Two more blocks showing  LQS fabric choice

While I am using the fabrics chosen by my LQS for my Block of the Month, Rachel is creating blocks with fabrics she has chosen. What do you think?

Rachel's Block
Rachel’s block with her chosen fabrics
Marti Michell Templates

To create our BOM blocks, we are using templates that are brand new to me – the 3″ Square Basic Set by Marti Michell.  Have you used her templates before? I LOVE how easy it is to match up pieces and POINTS for sewing AND there are no blasted dog ears to trim off.

Oh, in  addition to using the template set,  we added this book into the mix for MORE BLOCKS that can be created from this ONE SET.

Marti Michell Volume 1

Are you curious to see just what ONE SET of TEMPLATES can do??? Check out this very brief video.

Well, I better run! Gotta get this block done so that I can get the next one FREE from my LQS.

~PattyAnne
PS. Please share with your friends using the links on the left.

//ws-na.amazon-adsystem.com/widgets/q?ServiceVersion=20070822&OneJS=1&Operation=GetAdHtml&MarketPlace=US&source=ss&ref=as_ss_li_til&ad_type=product_link&tracking_id=patt0b0-20&marketplace=amazon&region=US&placement=B005KBXF0Q&asins=B005KBXF0Q&linkId=981db09ec089465c5e9cbff58371cd06&show_border=true&link_opens_in_new_window=true

Just for fun....

Silicone Spray and Olfa Cutting Mat Tip

Silicone Spray and Olfa Cutting Mat Tip


Silicone Spray and Olfa Mat
My mat and of course a steamy cup of COFFEE. 🙂

Do you have an Olfa Rotating Mat? Have you ever had trouble spinning your Olfa ‘Spinning’ Mat?

I recently had this problem when my friend Rachel, from Little Bird Quilting, came over to my house to play/sew. Since she was having an issue with my cutting mat, she gave me this GREAT TIP!

Is your mat a teeny bit sticky? Try Rachel’s helpful tip!


~PattyAnne (the vitameatavegamin girl) and Rachel

PS. Remember this Lucy Show?? I LOVE/MISS Lucy!

“Hello friends. I’m your Vitameatavegamin girl. Are you tired, run-down, listless? Do you poop out at parties? Are you unpopular? The answer to all your problems is in this little bottle. Vitameatavegamin. Yes, Vitameatavegamin contains Vitamins Meat Vegetables and Minerals. Yes, with Vitameatavegamin, you can spoon your way to health. All you do is take a great big tablespoonful after every meal. Mmmmmmm….. It’s so tasty, too! Tastes just like candy! So why don’t you join all the thousands of happy peppy people and get a great big bottle of Vitameatavegamin tomorrow! That’s Vita-meata-vegamin!” WINK

//ws-na.amazon-adsystem.com/widgets/q?ServiceVersion=20070822&OneJS=1&Operation=GetAdHtml&MarketPlace=US&source=ss&ref=as_ss_li_til&ad_type=product_link&tracking_id=patt0b0-20&marketplace=amazon&region=US&placement=B01IE7LSGK&asins=B01IE7LSGK&linkId=de3df011995cb573c143c7c76afd82f2&show_border=true&link_opens_in_new_window=true
//ws-na.amazon-adsystem.com/widgets/q?ServiceVersion=20070822&OneJS=1&Operation=GetAdHtml&MarketPlace=US&source=ss&ref=as_ss_li_til&ad_type=product_link&tracking_id=patt0b0-20&marketplace=amazon&region=US&placement=B000YZ7TSC&asins=B000YZ7TSC&linkId=83f43d830ecb5fdea8631ac6f695225a&show_border=true&link_opens_in_new_window=true

Just for fun....

PattyAnne’s BOW #5 BONUS – Flower Pounding Part 2

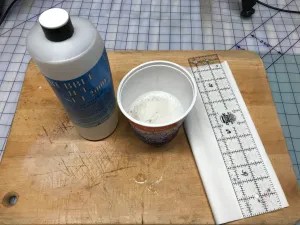
To make your fabric ready for pounding, you will need to soak it for 5 minutes in Bubble Jet 2000 (See previous blog post for a link to the product.)

Flower Pounding Setup
Soaking the fabric for Flower Pounding

The directions on the bottle say to lay your fabric out flat but I didn’t do that. I’m thinking they say that in case you are doing yards of it.  My pieces measure approximately 12.5 x 11 inches.

So I put the folded up pieces in an old cottage cheese container and soaked them  for the 5 mins.  (I made sure I  kind of tapped them down so that all pieces/areas got wet from the solution. I also shook the bottle of Bubble Jet before using it.)

Flower Pounding Fabric Drying
Allowing the Flower Pounding Fabric to Dry

After the 5 minutes was up, I took the pieces out of the solution and squeezed them slightly to remove some of the solution and then I placed them on my cutting mat to dry.  When dry, I’ll iron them and they will be ready for the next part —- the FUN, EXCITING PART!    Don’t forget to pour the leftover Bubble Jet 2000 BACK INTO THE BOTTLE because it can be reused!!!

Ok, now for the recipe for the FAUX Bubble Jet 2000

2 Tablespoons of Alum (found in the spices section of your grocery store)

2.5 teaspoons of WASHING soda (NOT plain baking soda.  An example is Arm & Hammer Soda WASH)  If you cannot find it in the grocery store in the cleaning isle, you may find it at a hardware store such as ACE.  If all else fails, here is a link to a site that shows how to make your own.  I’ve not tried it, but……

1/2 teaspoon of liquid fabric softener

1 cup of HOT WATER

Mix all the above ingredients together in a bowl larger than you think you’ll need because it foams up.  After the foam dies down, you will be left with the liquid.  Soak your 100% cotton fabric in the solution for 5 – 10 minutes.  Lightly squeeze excess liquid from the fabric.  Hang fabric to dry.  When it is dry, iron it.  Again, put the leftover FAUX Bubble Jet 2000 in a LABELED container for future use.

Next up…. gather your flowers, leaves and ferns!

Happy Quilting!

~PattyAnne

Just for fun....

PattyAnne’s BOW #5 BONUS – Flower Pounding Part 1

Flower Pounding
One of my very first Flower Poundings

I’m working on a really fun project today. Flower pounding is a noisy BLAST. (You may want to wear ear protection – seriously.)  Last time I taught this at my local quilt shop I think the gal who does the longarming there was about to go NUTS until she put on her headphone ear protection….. Sorry Debbie!

In the video I tell you the basic supplies you will need for the project. I also have links to them below the video if you are unable to find the products locally.

Don’t forget, I will be back later to show you how you can make your own “cheap seat” Bubble Jet 2000 (sorta kinda) from easily purchased grocery store items~PattyAnne

PS. Meet me back here soon! I’ll demo the making of the faux Bubble Jet 2000.

Happy Quilting!!

~PattyAnne

//ws-na.amazon-adsystem.com/widgets/q?ServiceVersion=20070822&OneJS=1&Operation=GetAdHtml&MarketPlace=US&source=ss&ref=as_ss_li_til&ad_type=product_link&tracking_id=patt0b0-20&marketplace=amazon&region=US&placement=B0096XYFNU&asins=B0096XYFNU&linkId=246157e99a9a9d314ca0e1cf9e94cd80&show_border=true&link_opens_in_new_window=true
//ws-na.amazon-adsystem.com/widgets/q?ServiceVersion=20070822&OneJS=1&Operation=GetAdHtml&MarketPlace=US&source=ss&ref=as_ss_li_til&ad_type=product_link&tracking_id=patt0b0-20&marketplace=amazon&region=US&placement=B000F56QDA&asins=B000F56QDA&linkId=e9f72c40cfe4548cad3d5047acfa0c89&show_border=true&link_opens_in_new_window=true
//ws-na.amazon-adsystem.com/widgets/q?ServiceVersion=20070822&OneJS=1&Operation=GetAdHtml&MarketPlace=US&source=ss&ref=as_ss_li_til&ad_type=product_link&tracking_id=patt0b0-20&marketplace=amazon&region=US&placement=B003NU63BO&asins=B003NU63BO&linkId=6f53aa444822448825f15a482b1c3482&show_border=true&link_opens_in_new_window=true

Let's plan our quilting!

Using Dry Erase Markers to Plan Free Motion Quilting

Marking a Block with Dry Erase Marker
I’m using Plexiglas in this photo to design my quilting

I love planning my quilting using dry erase markers and a piece of Plexiglas that can be purchased at a Home Improvement store inexpensively. I have tried to use some of my other rulers, and while it does work,  the view is somewhat obscured because of all the markings on the rulers.

Marking a Block with Dry Erase Marker
Here I’m using a ruler. I can see ‘ok’.
Marking a Block with Dry Erase Marker
I’m using another ruler here. It is quite difficult to see because of all the ruler markings


For the actual quilt block, I’m going to quilt diagonal lines with my walking foot.

Lori Kennedy's Machine Quilting book
Lori Kennedy’s Machine Quilting book

Since I will be whipping up two more blocks (and making this into a super fun table runner) there will be sashing and borders to quilt.   In these areas, I’ll quilt a design from Lori Kennedy’s book (get the ebook for $9.99). Anyhoooo, the design is called “Double Loop Vine” and I think it perfectly mimics the leaves in the fabrics, don’t you?

Loop by Lori Kennedy
Double Loop Vine – Quilting pattern that Lori teaches in her book


My Fabric
My fabric. Check out the leaves under the bird!

Thanks for stopping by! Let’s go machine quilt our own quilts.
~PattyAnne

Just for fun....

LOTS of BOWs in the Cue for Upcoming Months

BOWs (Block of the Week)

Sooooo, I have a few BOWs cued up including this block (shhhh….take a sneak peek of it on my Electric Quilt screen).  Fabrics are First Mate by Northcott.

BOW setup
BOWs (Block(s) of the Week) in the making.

Lots of cool blocks are being planned!!

Some are traditional blocks and others are not. One of the non-traditional blocks (a featured BOW in July) will be a flower pounded block. During the first session of  Flower Pounding Week, there will be a demo on how to ready your fabric for the project. Next I will show the flower pounding process (hold your ears!) . Finally, ways to enhance your block with thread painting and Derwent pencils will be demonstrated.  

Thanks so much for tuning in.  Please share my blog/YouTube/facebook with your buddies.

~PattyAnne

PS If you’re wondering about that JUMBO microphone in my photo….. I used to podcast for Archie Comics and that is the mic I used.  It’s great for eliminating noisy feedback. 🙂

BOWs Electric Quilt
Electric Quilt
BOWs with EQ Mini
EQ Mini


Uncategorized

LOTS of BOWs in the cue

Sooooo, I have a few BOWs cued up including this block (shhhh….take a sneak peek of it on my Electric Quilt screen).  Fabrics are First Mate by Northcott.

microphone set up

I’ve got lots of cool blocks planned. Some are traditional and others are not. For example, for one of the non-traditional blocks, we will do  flower pounding in July.  I will demo how to do the flower pounding technique and show ways to enhance your block with thread painting.

Thanks so much for tuning in.  Please share my blog/YouTube/facebook with your buddies.

~PattyAnne

PS If you’re wondering about that JUMBO microphone in my photo….. I used to podcast for Archie Comics and that is the mic I used.  It’s great for eliminating noisy feedback. 🙂


Road to Oklahoma

PattyAnne’s BOW #4 Part 2 – Road to Oklahoma – Marking & Cutting Fabric

​​I LOVE the fabric used for this block – especially the blue with the little gold flecks. I love a bit of bling!!💕

The cutting for this block is pretty straightforward. If you go to my previous blog post, I have written out the cutting dimensions for you.

As mentioned in the notes for the video, if you’d like to use the same fabrics that I’ve used, you can purchase a fat quarter bundle from Christa Quilts here.

Next on to BOW #3 Part Three where we plan our quilting strategy AND quilt the block.  See you there!!

~PattyAnne
PS. If you’re enjoying these vides (and blog) please share across social media!

Road to Oklahoma

PattyAnne’s BOW #4 Part 1 Intro – Road to Oklahoma

In this video,  variations of the Road to Oklahoma four-block layout are shown.  As mentioned in the video, the final four-block quilt measures 20″ x 20″ – a perfect size for a table topper or a wall-hanging.

Cutting directions for EACH of the 9″ x 9″ blocks:

  • Cut 4 squares 2 3/4″ x 2 3/4″  (green blue and white fabrics)
  • Cut 2 squares 2 1/8″ x 2 1/8″ (green and blue fabrics)

Tune in to Part 2 where we will cut and sew the block.

Next, on to Part 3 where we will plan the free motion quilting, plan the walking foot portion of the quilting AND actually quilt the block.

Electric Quilt Software can be purchased here: http://amzn.to/2sW7gUl

~PattyAnne
PS. If you’re enjoying these vides (and blog) please share across social media!

Road to Oklahoma

I Love the Color Palette for BOW #4

These colors just make my heart sing. I cannot WAIT to get started on this BOW! The patterns and videos  will be eady…… I’ll meet you back  here on Sunday!!

Today, however, I’m resting after eye surgery – YES, I’m THAT old.  Don’t worry though, I’ll be up and at ’em in a day (says ME).

For now, I hope you are enjoying these BOW quilt alongs as much as I am. 🙂

See you soon to enjoy a cuppa together AND a new BOW.

~PattyAnne

PS. LMK if you have a favorite block you’d like me to work on!!

BOW4

Two of my FAVORITE quilting tools:
I love using these pins to baste my quilts rather than the ‘stinky’ spray baste. Click on the image for more details.


Also, I ALWYS wear my Machingers Gloves whether I’m walking foot quilting or free motion quilting. Again, click if you’d like more info.